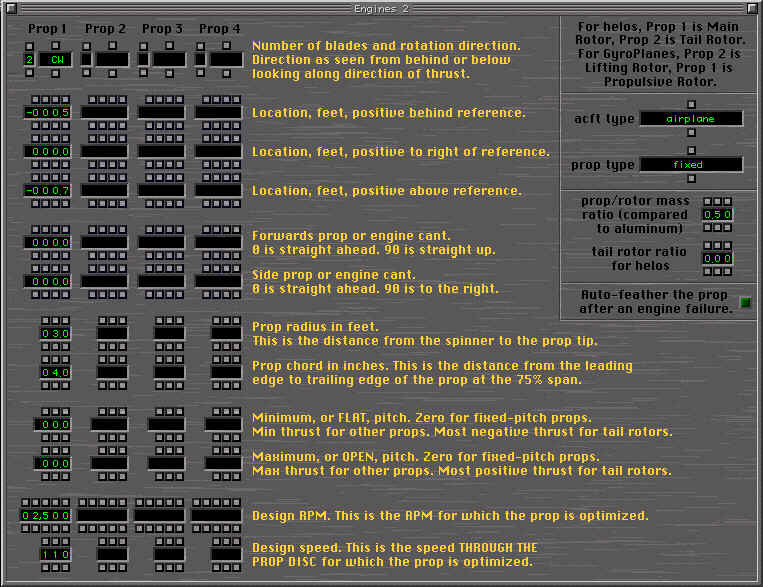
PROP1 will have two blade (default) and will spin clockwise (CW).
LOCATION POSITIVE AFT OF REFERENCE POINT is set to -0.5 which is a
little ahead of the nose.
LOCATION POSTIVE RIGHT is 0.0 since we want the engine on the
centerline.
LOCATION POSITIVE ABOVE is set to -0.7 to put the prop a little
below the nose.
FORWARD and SIDE angles are both zero. This is a straight mount.
PROP RADIUS is set to 3.0 ft
PROP CHORD is 4.0inches
MINIMUM AND MAXIMUM pitch are zero since this is a fixed pitch prop.
DESIGN RPM is 2500rpm which what I chose as a cruise setting.
DESIGN SPEED is 110kts which is what I want as a cruise speed.
ACFT type is airplane
PROP TYPE is fixed
PROP MASS is 0.5 (plastic)
ROTOR RATIO is for helocopters
AUTO-FEATHER is no
25
Here you can see the propeller on the aircraft. Now we
will attach an engine nacelle. Unlike most other parts of an aircraft, the
engine nacelle attaches to the prop hub and the prop hub is the
zero-point. If you should move an engine the nacelles will go with.
26
Go to STANDARD and
ENGINE NACELLE 1. You'll now get a menu a lot like the fuselage menu. The
main differences are listed below.
AIRCRAFT HAS ENGINE NACELLES. If set to yes it will draw them,
otherwise they are invisible.
NACELLE RADIUS - Just like for the fuselage. Again Z and X zoom in
and out.
PANES - as the fuselage but the location numbers are based on where
the engine is and not the fuselage.
COPY FROM #1,#2,#3,#4 this is a time saving function. If you've
built a nacelle you like you can copy it by hitting these different
buttons
THERE IS NOT AN UNDO SAVE YOUR WORK OFTEN
27
Here I've built a
nacelle for the engine and it is not very 'simple' but it does display how
one can work with a prop.
AIRCRAFT HAS ENGINE NACELLE change to YES
NACELLE RADIUS to 2.5
Change PANE 1 to a dot in the center. Drop out of this menu and hold
down the SHIFT+N key and you'll warp the nacelle to a cone. Now come
back and make your other adjustments.
Change the numbers over the panes to match the screenshot. Note that
0.0 is the prop hub, so PANE1 will be set to -0.5 so we get a
'spinner'
Look at PANE 8-10. The pinched effect here will give us an 'exhaust
pipe' look.
PANE11 is just a single point just AHEAD of PANE10 This gives the
pipe a squared of look.
REMEMBER THAT NO TWO PANES CAN HAVE THE SAME NUMBER, X-PLANE WILL
BOOT YOU OUT.
28
Here are a couple
screenshots of the engine nacelle. Note the exhaust pipes.
29
This nacelle is really
boxy, but this is a small aircraft and a big motor :)
Note the white dot in the propeller hub. This is where the 'zero-point'
is for the nacelle and is why PANE1 required a negative number.